.png)


Criminal Checker - Post Installation Guide
We offer free installation and setup for our prospects and customers. Please email us at solutions@cloudmaveninc.com for further assistance.
1. Admin Setup:
- Login to your Salesforce org where the package is installed.
- Go to the “Criminal App Setup” tab and read the instructions to complete the easy setup steps.
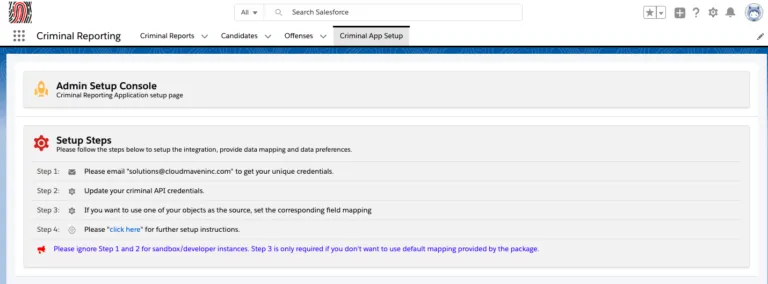
- Step 1: Please email “solutions@cloudmaveninc.com” to get your unique credentials for test and production.
- Step 2: Click on the Gear Icon to update your API credentials and Criminal report preferences.
- Step 3: If you want to use one of your objects as the source, Set the corresponding field mapping.
- Step 3 is only required if you don’t want to use default mapping provided by the package.
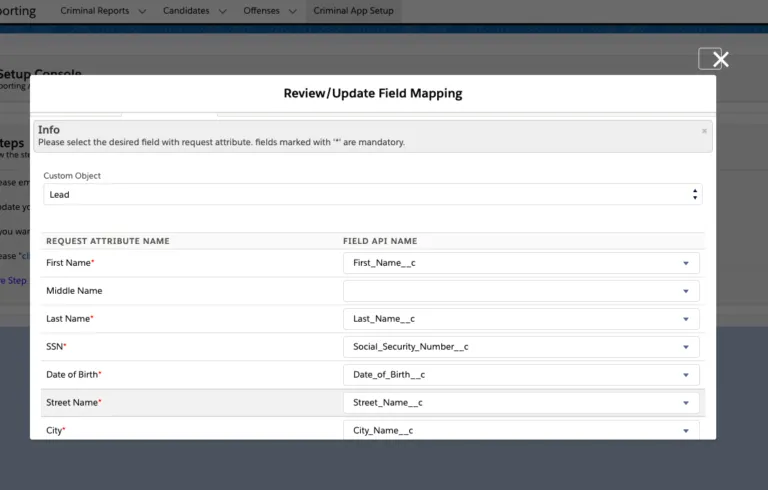
2. Required Fields:
We need the following fields to pull the credit report from the credit bureaus. Please make sure you have these fields on your source object:
- First Name
- Last Name
- SSN(Social Security Number)
- The DOB(Date of Birth)
- Street Address
- Zip/Postal Code
- State Code – ISO Code
- Country Code – Country Code
Create a new field “Run Criminal Check” checkbox on the source object. This field will be used to validate when to run the criminal checker.
If your source object is different than Account, Opportunity, Lead, and Contact. Please create a lookup field on the “Criminal Report” object and make your source object as the parent.
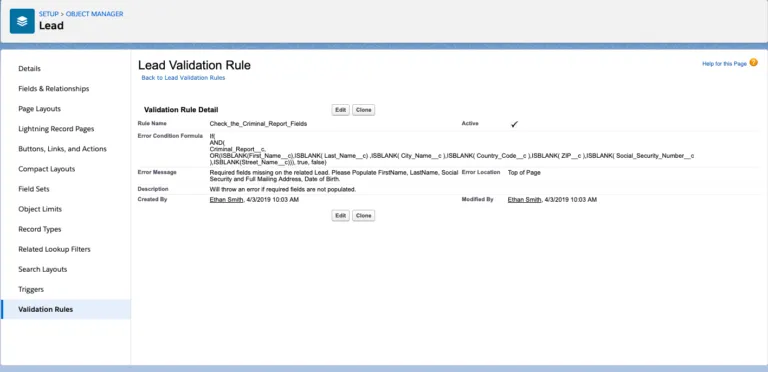
3. Validation Rule
Please add a validation rule on the source object to ensure that required fields to run criminal report is present when the user is checking the”Run Criminal Report” custom field. Please change the fields as per your org configuration.
Validation Rule for Contact:
If( AND
Run_Criminal_Report__c,
OR(ISBLANK(FirstName), ISBLANK(LastName), ISBLANK(MailingCity), ISBLANK(MailingCountry), ISBLANK(MailingPostalCode), ISBLN
K(Text(MailingStateCode)), ISBLANK(Social_Security_Number__c), ISBLANK(Birthdate), ISBLANK(MailingStreet))), true, false)
Validation Rule for Account:
If( AND
Run_Criminal_Report__c,
OR(ISBLANK(FirstName), ISBLANK(LastName), ISBLANK(BillingCity), ISBLANK(BillingCountry), ISBLANK(BillingPostalCode), ISBLANK
(Text(BillingStateCode)), ISBLANK(Social_Security_Number__c), ISBLANK(Birthdate), ISBLANK(BillingStreet))), true, false)
Message:
Required fields missing on the related contact. Please Populate First Name, Last Name, Social Security and Full Mailing Address
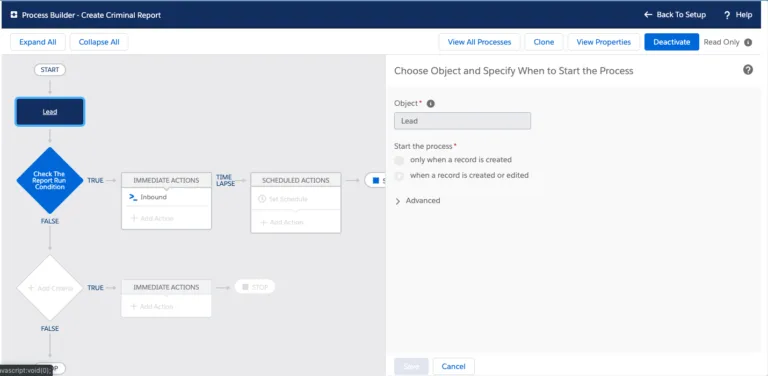
4. Process Builder
Automating Criminal Check Run.
- In this step, we are going to create a process builder on your source object(lead, Contact, Opportunity, Account or any other custom object). Using this step, the system will automatically create and run the credit report.
- Go to Setup >> Search for process builder in Quick Find Box.

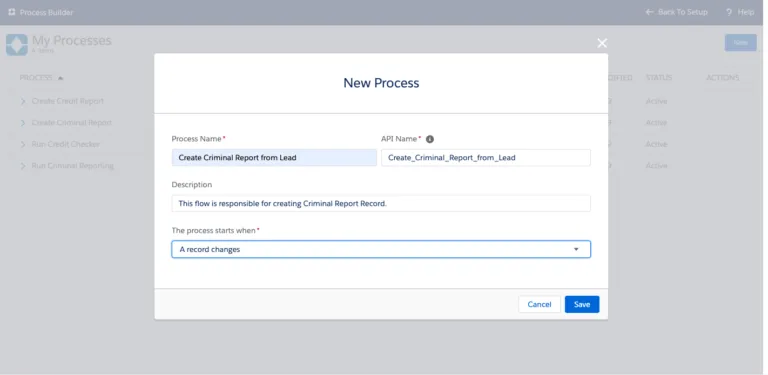
4.1 The process to create a criminal report:
Click New.
- Enter Process Name (Process name can be anything, set it according to your preferences) Ex: Create criminal report.
- API Name
- Description
- The process starts when Identifies when the process begins. Select when “A record changes”
- See Image for Reference**
4.1.2 Setting Up Process Builder
- Click add an object. Select your source object which could be Account, Contact, Lead, Opportunity or any other object.
- Start the process* select “when a record is created or edited”.
- Before saving your changes, confirm the selection because you can’t change the object after you save it.
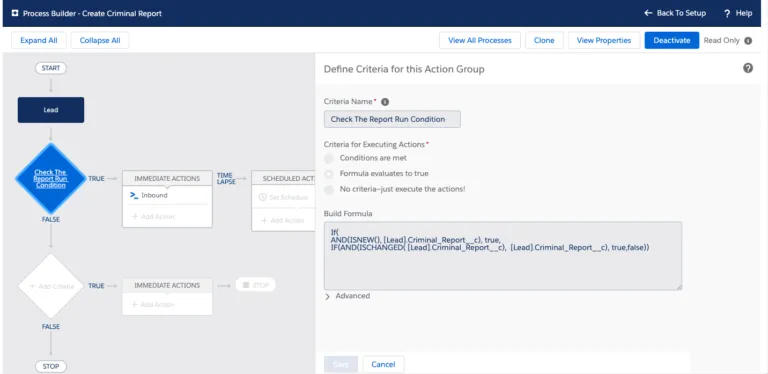
Add Criteria –
- Provide Trigger Name
- Add “Matching Conditions” – always select “Conditions are meet” option. Provide the formula for evaluation. We recommend using an ID or other fields that uniquely identifies records so the process can pick exactly one record.
2. Select and Define Action
- Action Type* – “Select Apex”.
- Action Name* – Provide unique name
- Apex Class * – Select “Auto Create Criminal Report Record”.
- Set Apex Variables
- Select “Add Rows”
- Field* – Select “listIds”
- Type* – Select field reference.
- Value* – Select source object Id field.

3. Activate the process builder.
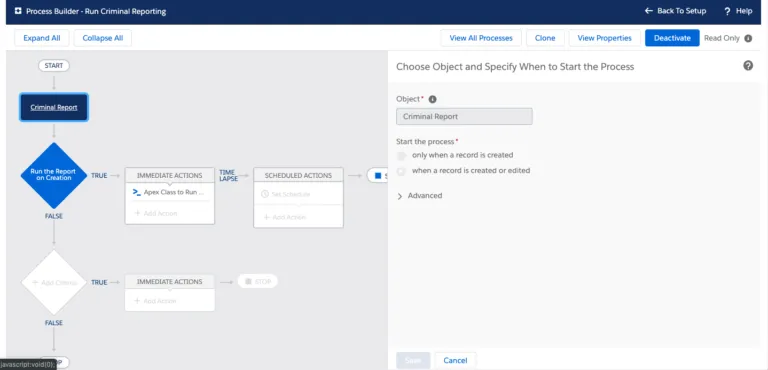
4.2 Automating Criminal Report Pull:
In this step, we are going to create another Process Builder on Criminal Report Object. Using this process, the system will automatically pull the Criminal Report.
From Setup, enter Builder in the Quick Find box(same as you have done earlier) and select Process Builder.
Click New.
4.2.1 Setting Up Process Builder:
- Process Name. Example – Automatically run a criminal report(it is based on your own choice.)
- API Name
- Description
- Process starts when “A record changes”
- Click add an object. Select “Criminal Report”.
- Start the process “when a record is created or edited”.
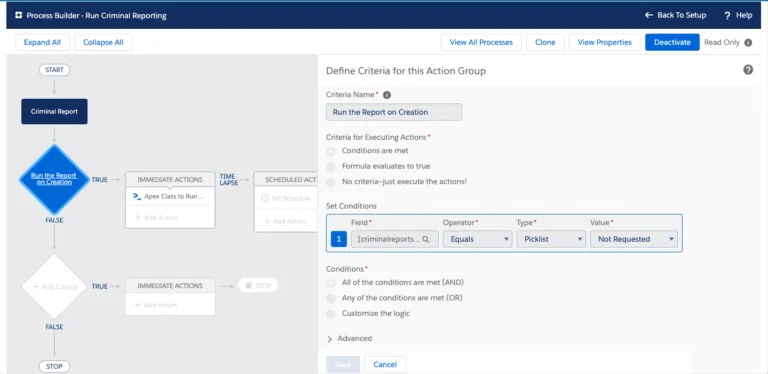
Criteria for Criminal Pull:
- Provide Trigger Name.
- Add “Matching Conditions” – always select “Conditions are meet” option.
- Provide Conditions, Status = “Not Requested”
Defining Action for Credit Pull Process.
- Action Type – “Select Apex”
- Action Name – Provide a unique name.
- Apex Class – Select “Automatically Run Criminal Reports”
- Set Apex Variables
- Select “Add Rows”
- Field – Select “listIds”
- Type – Select field reference.
- Value – Select object Id Field.
- See Screnshot for reference.

Congratulations You have successfully Installed “Criminal Checker” app.
Go ahead and run your first report.
If you have any queries regarding the criminal checker app please reach out to us at support@cloudmaveninc.com.